
Adding members with a custom Apple Shortcut


Each week we go down rabbit holes so you don't have to. We share tactics, trends and valuable resources we've observed in the world of community building.
💫 Subscribe to The Observatory
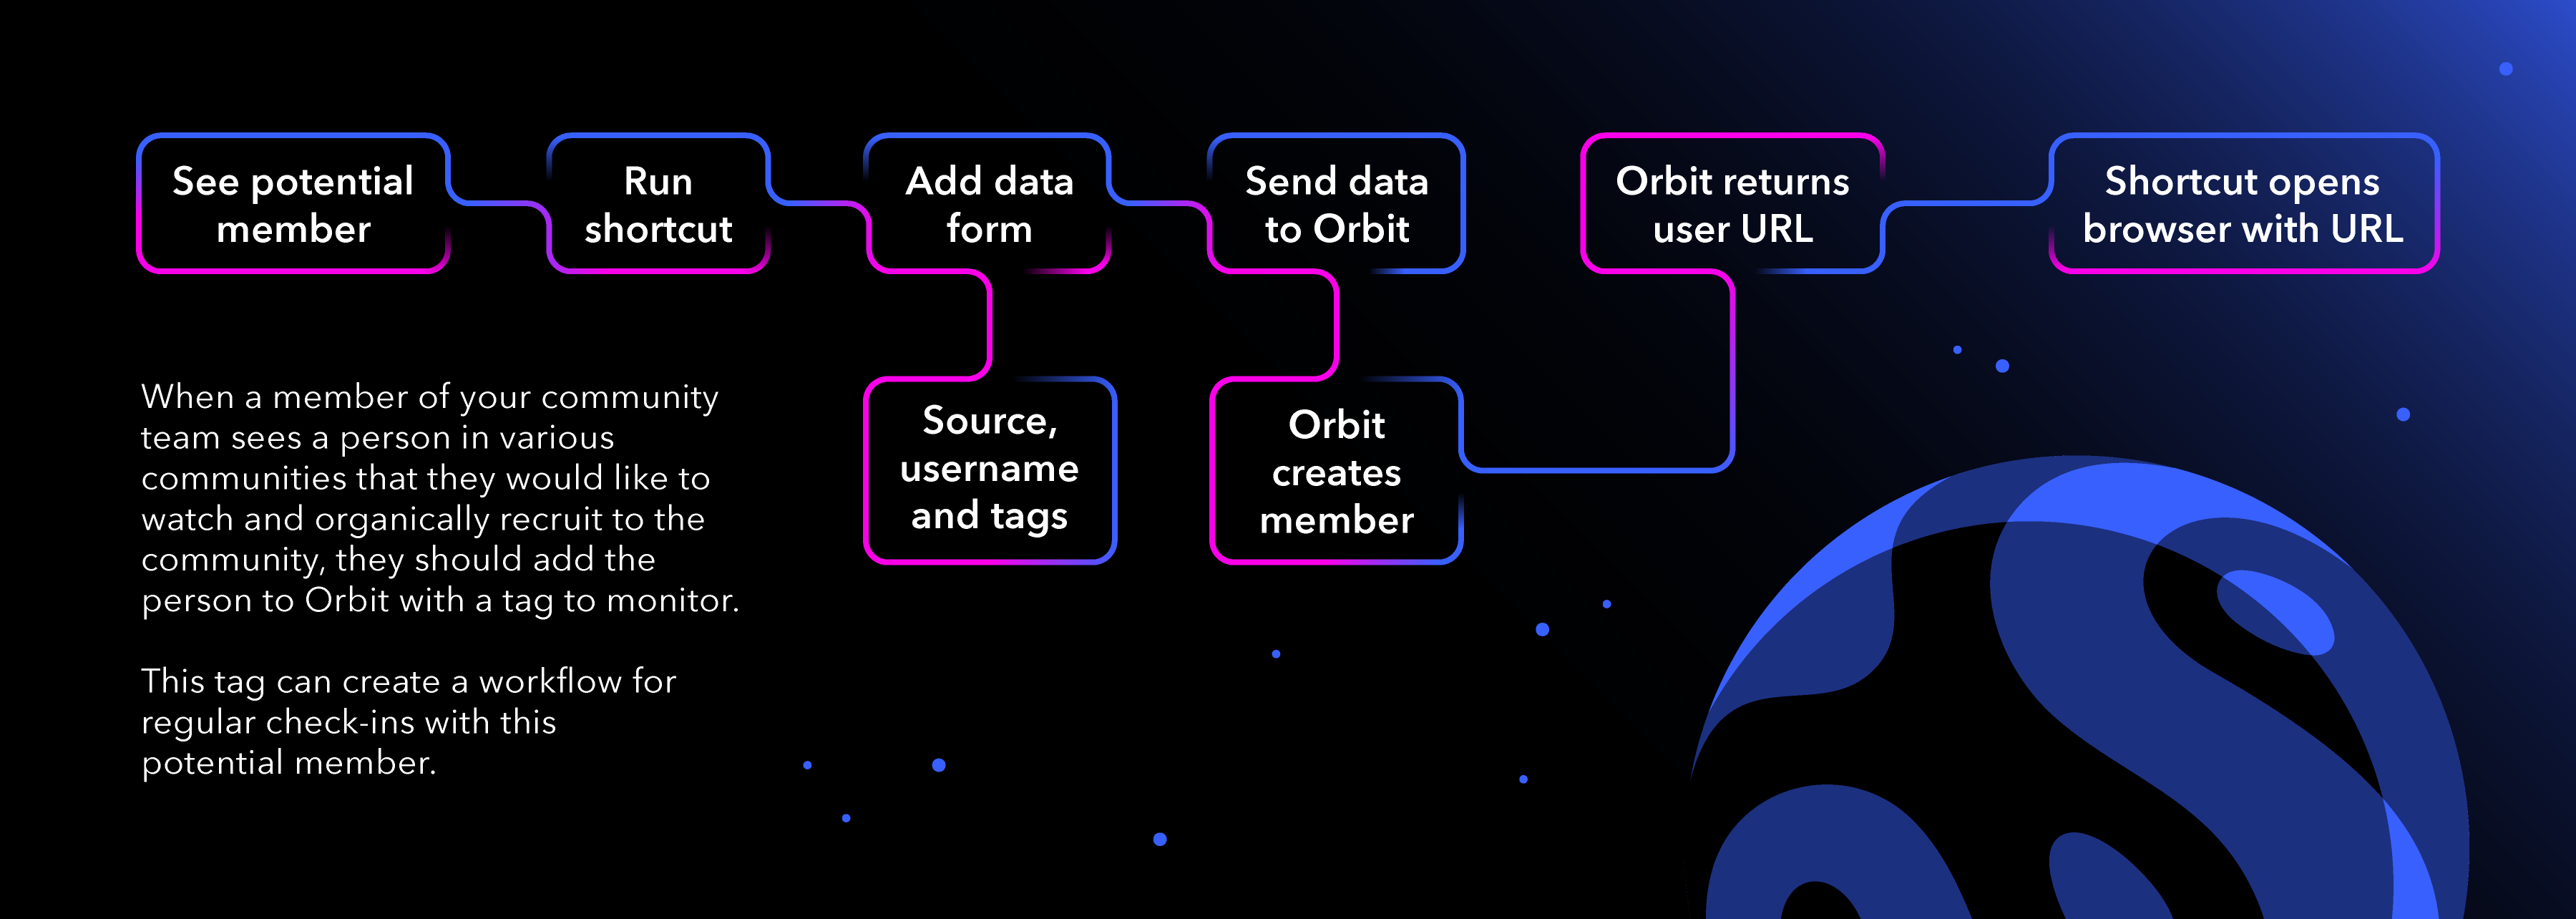
In the course of your community work, you may want to add or update a member on the fly.
Maybe you've identified a Twitter user who talks about adjacent topics and you want to follow up and track that interaction.
Maybe you're in a meeting with a community member and you need to quickly add a tag to their profile.
Sure, you can jump into your Orbit workspace and update or create the user. That's an awful lot of clicks and page loads for something you may want to be swift and agile.
Enter the Orbit API, serverless functions, and tools like Apple's Shortcuts.
In this tutorial, we'll cover the basics of building a function to create or update a member and then how to use tools like Apple Shortcuts to allow your team members to access it in a user-friendly way.
Requirements
To follow this tutorial, you'll need a few required pieces of information and technical understanding.
- An Orbit workspace and workspace ID
- A personal Orbit API key
- Knowledge of NodeJS and basic knowledge of serverless functions
- For Shortcuts, a macOS, iOS, or iPadOS device
Basic structure for the tool(s)
To make this as flexible as possible for individual team members to use various tools, we'll set this up as a serverless function that can take in a few pieces of data.
To find or create a new member, we need to provide identity data. For our purposes, the function will accept the following parameters:
- a source (e.g. Twitter, Discord, GitHub, email)
- a username (e.g. a Twitter handle like OrbitModel)
- a comma-separated list of tags ("added:followup, bryan:followup")
The tags are optional, but a good idea. This will allow you to sort by folks that you want to bring closer into your orbit. A new member with no activities isn't useful on their own.
For security and log purposes, we'll also use individual Orbit API keys. This will let us know which teammate has added the person, as well as act as a way to secure an otherwise unsecured API endpoint. The API key will be submitted as a header variable to further secure it.
For the Shortcut, we'll want our request handler to send back a success status and a URL to direct a browser to open. This URL should be the new member page that has been added.
The serverless function
The serverless function acts as the main logic for our tool. This is where we'll collect, mutate, and submit the data to the Orbit API. This demo uses a serverless function because as a developer I like to write code. This could also be converted into a Zapier integration, as well.
The code for this function is currently optimized for Netlify's functions as a service offering but can be picked up and used in any FaaS platform. From the GitHub repository, you can 1-click install it to your Netlify account.
{% c-block language="javascript" %}
// When running locally, get environment variables from a .env file
require('dotenv').config()
// Need an HTTP request library. Node-fetch works, but Axios would also work
const fetch = require('node-fetch').default
const handler = async (event) => {
try {
// Get the data from the request. Tags is optional, so provide a default
const { source, username, tags = '' } = event.queryStringParameters
// Get the access token from the event headers
const apiKey = event.headers['x-api-key']
// Check that the API key is valid
if (!apiKey) return {
statusCode: 401,
body: JSON.stringify({
error: 'Missing API key'
})
}
// Check that there is a source and username (both required)
if (source === '' || username === '') return {
statusCode: 500,
body: JSON.stringify({
error: 'Need both Source and username'
})
}
// Craft the proper options for the HTTP request in node-fetch
const options = {
method: 'POST',
headers: {
Accept: 'application/json',
'Content-Type': 'application/json',
Authorization: `Bearer ${apiKey}`
},
body: JSON.stringify({
identity: {
source: source.toLowerCase(),
username
},
member: {
tags_to_add: tags
}
})
};
const response = await fetch('https://app.orbit.love/api/v1/${process.env.ORBIT_WORKSPACE}/members', options)
const json = await response.json()
// If an error is returned, throw the error to the console
if (json.error) throw new Error(json.error)
// Get a couple attributes necessary for the "frontend"
const { id, attributes } = json.data
const { name } = attributes
// Create the success object to send back.
// The URL will be used to open the member in the workspace
// The shortcut will automatically open this link
const successMessage = {
message: `Successfully added ${name} to the Orbit member list with id of ${id}`,
url: 'https://app.orbit.love/${process.env.ORBIT_WORKSPACE}/members/${id}'
}
return {
statusCode: 200,
body: JSON.stringify(successMessage),
}
} catch (error) {
return { statusCode: 500, body: error.toString() }
}
}
module.exports = { handler }
{% c-block-end %}
The Apple Shortcut
The Shortcut exists and is shareable. You can get it at this iCloud link. Unfortunately, as of this writing, Apple's share links don't recognize that the current version of macOS supports Shortcuts. You can add this Shortcut on iOS (for use on iOS, as well), and it will also become available to any Mac connected to the Apple ID.
To set the shortcut up from scratch requires a few steps.
First, open Shortcuts on your device. On MacOS, you'll want to create a "Menu Bar" shortcut to access it from the OS menu bar.
Create Shortcut inputs to gather data on the new member

To start, we need to ask the user a few questions: what's the source, the username, and the tags.
For the source, we'll create a selectable list to keep some control on data integrity. For the sample shortcut, I chose to create a "List" action and add Twitter, GitHub, and Discourse as selectable options.
The List then gets passed to a "Choose from ..." action. That will prompt the user to choose from the list.
Next we create two "Ask for Input" actions. One for the username and one for the tags. Both of these have prompts that can be entered. For my demo, I chose "What's the username?" and "Any tags (separate by commas)?" to be as clears as I could be.
Send a request with the data to the serverless function
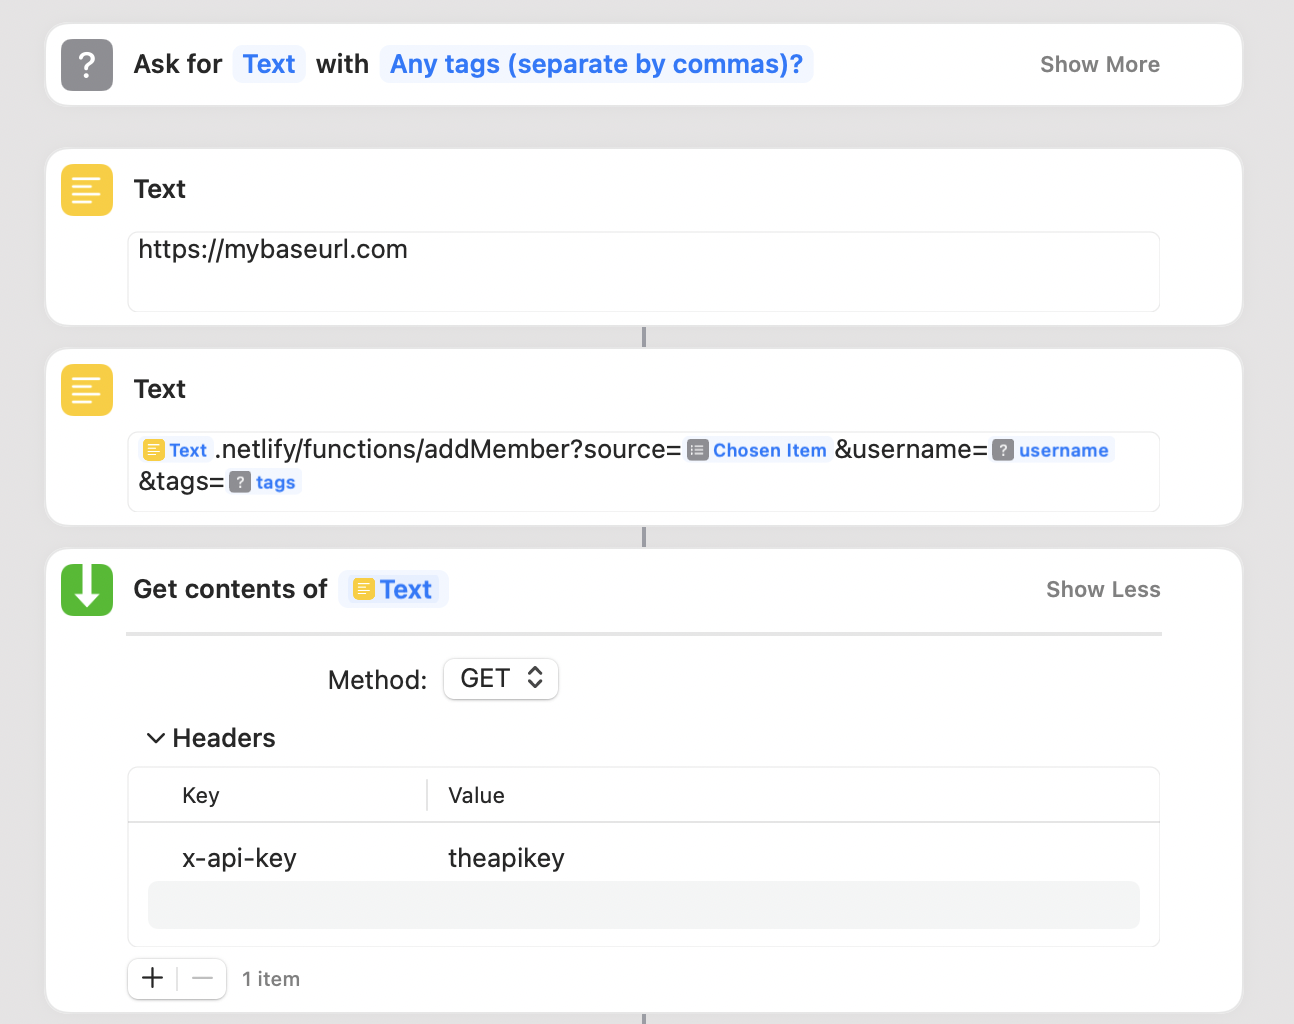
Then, we need to create the URL for the request. The URL lives in a text field. For my demo, I broke it into two text fields to allow one of them to be customized when installed. That customizable field is the base URL where the function lives. The next text box is the endpoint with query parameters matching our serverless function's needs with the data we asked the user for.
After that URL is ready, we pass it to a "Get contents of URL" action. This will send a GET request to the function. In the advanced options of the action, you can set the header to use your API key by setting a header with a key of x-api-key and a value of your API key.
Structure the data received back from the function

What the function returns is an object that's not ready for use with a Shortcut. We need to pass that into a "Get dictionary from" action. This will create a programmatic dictionary that we can use to get specific values. In this case, we want the value from the url property in the newly created dictionary.
Open the URL in the browser
After that, we can pass the URL to an "Open URLs" action to open the system's default browser to the newly created member's page.
And that's it! The shortcut is ready to submit new members to the workspace.
Next steps and customizations
This pattern is highly customizable. This serverless function could be used for the Shortcut, as well as a bookmarklet. You could modify it to create an optional note. You could create a version that registers an activity. You could have this be a form on a page on your intranet or in your Notion docs.
Because it's in code and is a wrapper for specific actions in the Orbit API, any configuration is possible.


