
Add Automation to Your Swag Process with Orbit


Each week we go down rabbit holes so you don't have to. We share tactics, trends and valuable resources we've observed in the world of community building.
💫 Subscribe to The Observatory
Whether it’s t-shirts, stickers, cable organizers, mugs, or prototyping boards, recognizing community members by sending them swag is a regular part of community management.
I recently spent some time talking to Orbit users about how they manage and maintain their swag sending processes, and, not to anyone’s surprise, every process is different. However, the majority of the differences are at the end of the pipeline when dealing with suppliers and distributors.
Some users have to manually submit orders one by one, and others have to compile a spreadsheet of order information. Sometimes the marketing department takes care of it. Very few are lucky enough to have an API endpoint they can hit to take care of the order, meaning that most processes will never be fully automated.
So, how can Orbit help? Well, although the final steps of most users swag ‘pipelines’ are different, the first steps are almost always the same:
- Identify a community member who is deserving of those sweet, sweet gifts
- Capture data from that community member to create an order
Orbit can certainly help with reducing the effort needed to cover off these steps. Below, I will outline how you could build an automated workflow to capture the data you need from community members at the click of a button.
Prerequisites
To build a flow similar to this for yourself you’ll need an Orbit account and a Zapier account (however, you could create the same workflows using Integromat, n8n, Automate.io, and others).
Triggering Your Workflow
How you identify people deserving of your beautiful swag items is up to you, but you’ll need a trigger to start the process.
In this example, I’ve used an Activity Type called ‘Send Swag’ which can be added manually to a member in your workspace.
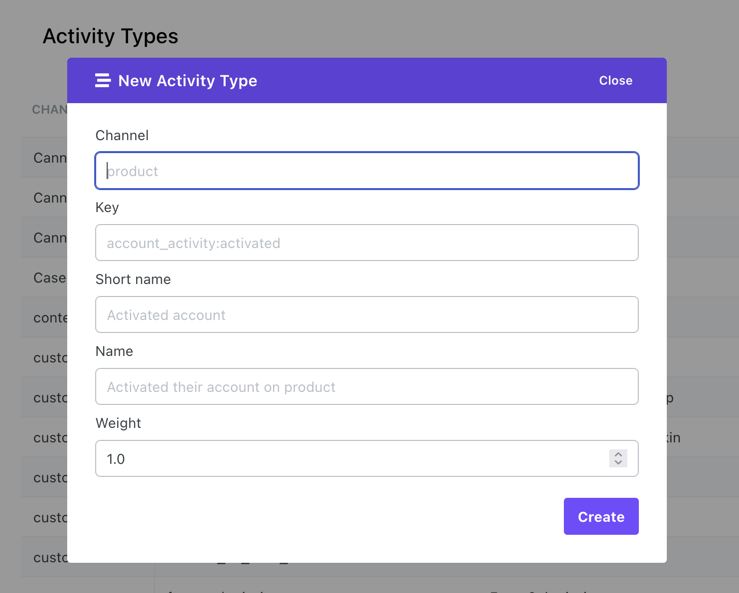
Set up a new Activity Type
To set this up for yourself, head to the Activity Types section of your workspace Settings and click on New Activity Type
Here’s how I set up the Activity on the Orbit workspace:
You can use whatever text you like in the Channel, Short name and Name fields but I would recommend using the same key if you’re going to follow along.
For reference, here’s a breakdown of those fields:
- Channel - Think of this as ‘Where is this activity coming from?’, in this case the activity is manually added, so we’ve chosen ‘Manual’.
- Key - A unique reference for this activity type. This will be referenced elsewhere in API integrations or low/no code applications such as Zapier.
- Short name - Appears in the list of Activity Types and also on the Member timeline
- Name - Appears in the dropdown list of Activity Types elsewhere in Orbit
Because this Activity Type is being used to trigger actions and isn’t initially performed by the community member you’re reaching out to, set the Weight to zero so that using this doesn’t impact their Love Score or Orbit Level.
Once your Activity Type has been set up, you can use it on a member profile via the manual Add Activity button below their picture.
Next, you need to set up your workflows in Zapier.
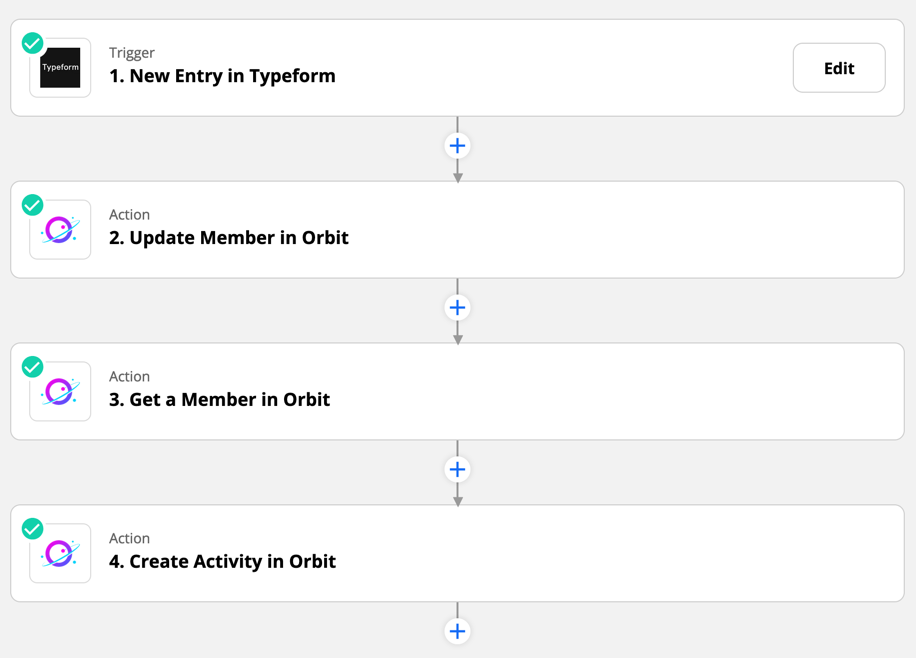
Zapier Workflow #1
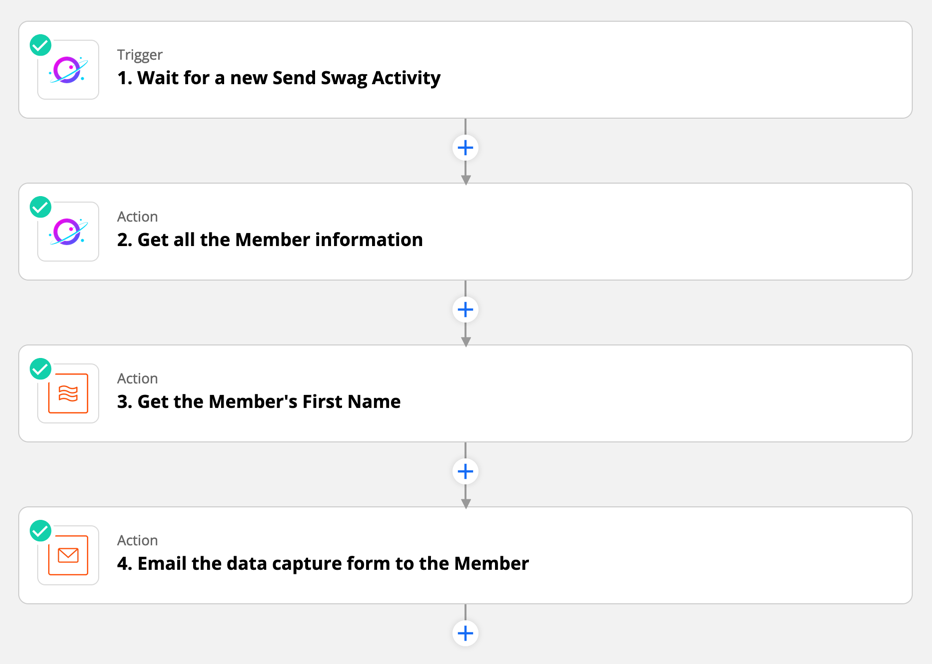
The first workflow will perform the following tasks:
- Watch for the Send Swag Activity Type.
- Get the necessary contact information for the member, their name and email address.
- Send an email to the member with a link to a Typeform for shipping information.
Inside Zapier, it looks like this (I added an extra step to get the first name of the member so I could better personalize the email we send them).
If you’re following along using Zapier, you can get started faster by copying our Zapier Shared Template for the above Zap. Then just add your own accounts and settings.
Set up the Trigger in Zapier
The first Zap is triggered by adding the Send Swag Activity Type to a member profile. This is set up by looking for a specific Activity Tag.
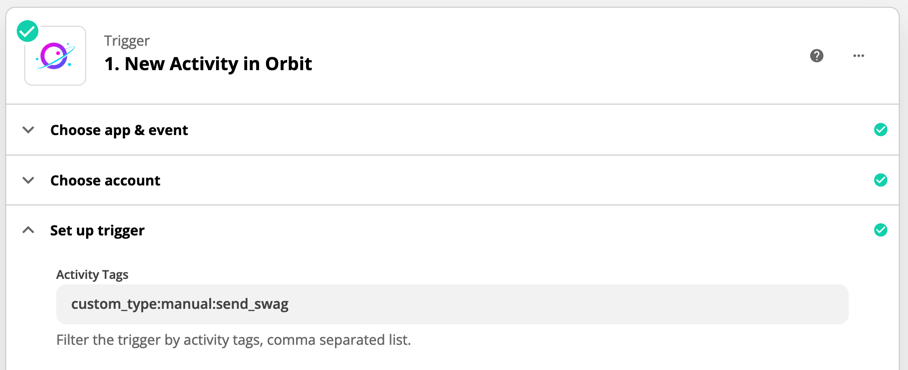
The format for this is custom_type:your_activity_key so you’ll need to add whatever key you chose for your Send Swag activity type. If you used the same one as me, then your trigger should be set up as shown above.
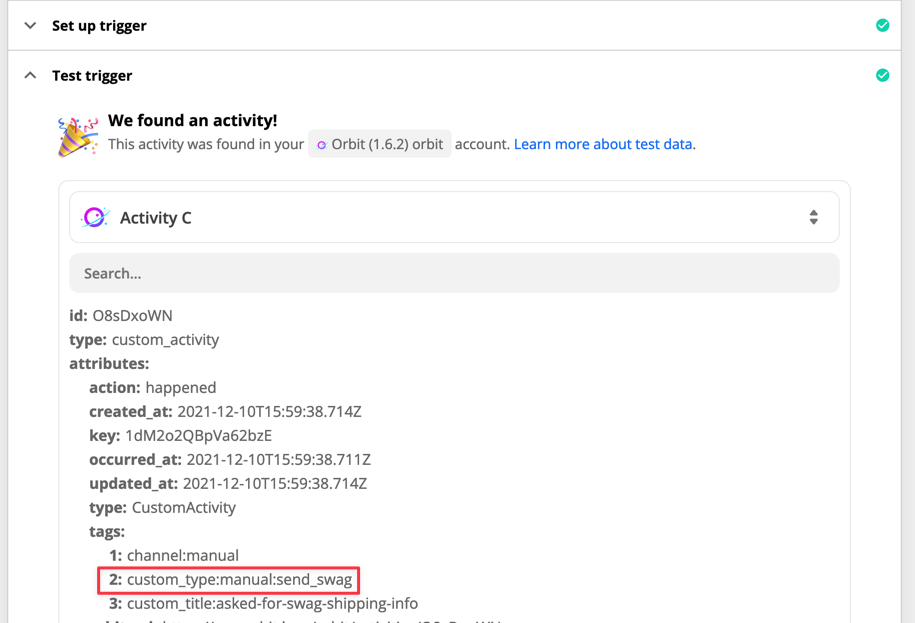
Remember: You will need to add a Send Swag Activity to a test profile on your workspace so that Zapier has something to find when you test this step.
When you test this step, you will get one (or more) responses from Orbit with activities that match the tag you set up:
Get additional member information
Activities will only return the member ID that they relate to. You will still need to get the additional information required to contact that member. This can be done as the second step using the Get a Member action.
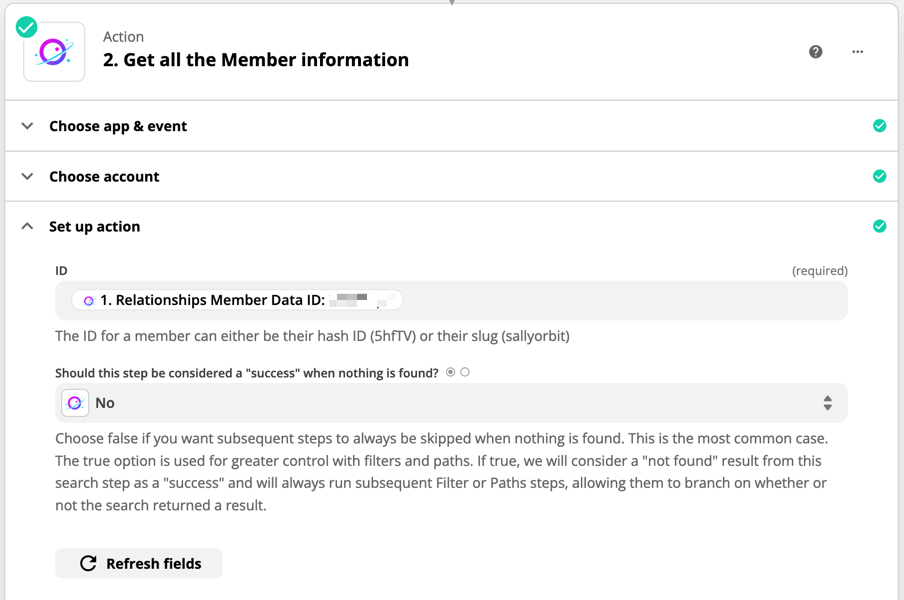
For this step, pass the Member ID into the ID field. The ID for the member will have been returned in the results from the first step and is labelled Relationships Member Data ID.
Send the form to the Member
Now that you have captured the activity, and retrieved the name and email address for the member the final step for this first workflow is to email them a link to a Typeform that we will use to capture their shipping information.
In this example I’ve used Zapier’s built in Send an Email action but you could replace this with your own email service or marketing platform should you require it.
The email set up is as follows:
Making the form link unique
In order to use the same Typeform each time this workflow is run we must ensure that shipping information (and any other data) it captures relates only to the member that receives the link.
To do this we must make the link unique by adding a Hidden Field called ID to the Typeform setup. This allows us to pass the Member ID over to the form so we can use it later to add the information to the correct Member profile once they submit it.

In the email setup above you can see we have our Typeform link (outlined in red) followed by #id= after which we add the ID of the member who is being sent the form.
You can find out more about setting up Hidden Fields in Typeform in their Help Center.
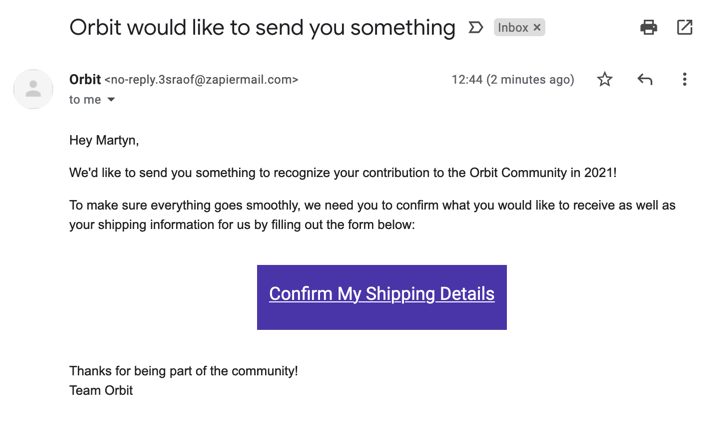
The Email
Once all the steps are set up, the Member receives an email, which in this example looks like this:
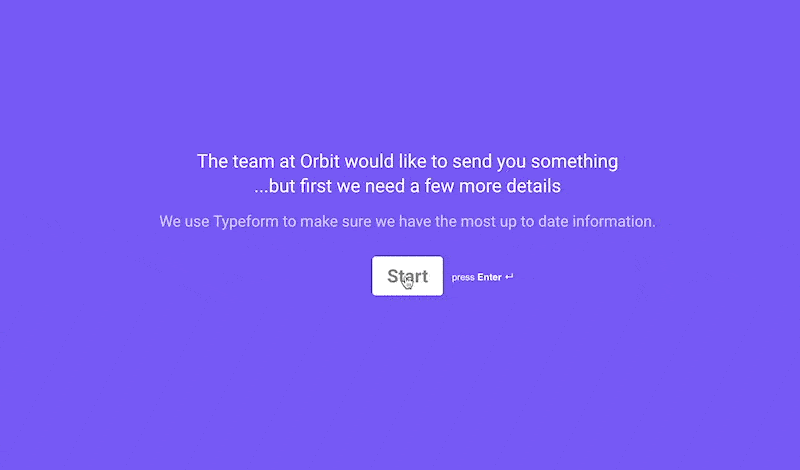
The Form
For reference, the form that users receive looks like this:
The following data is captured by the form:
- T-Shirt Size
- Address
- Town/City
- County/State
- Postal/Zip
- Country
- Phone Number
Once this form is submitted, it will trigger our second workflow Zap.
Zapier Workflow #2
The second workflow captures the data from the Typeform we send and then updates the Member’s profile with the shipping information and some new tags.
As with the first workflow, if you want to copy it from Zapier you will have all the steps set out for you (it assumes that you are using Typeform for your data capture).
This workflow performs the following tasks once the Typeform is submitted:
- Update the Member profile with their shipping address and t-shirt size
- Add a new tag to the Member profile: “Swag Data Completed”
- Add a new Activity to their timeline letting us know they completed the form
The second step, Update Member in Orbit is set up as follows:
Update the Member profile
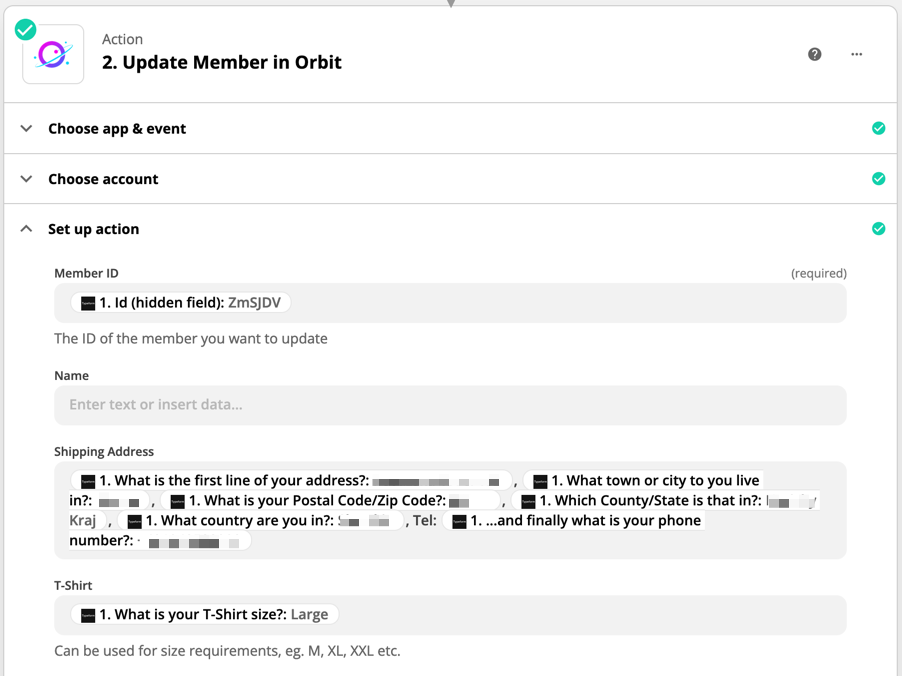
All the data being used has come from the Member via their Typeform submission, this includes their Member ID which we passed to the form as a hidden field.
The Shipping Address data takes a block of text, which means you can format it however you like. In this example I’ve separated the elements using a comma and added an extra piece at the end to store the telephone number.
Orbit has a specific field for T-Shirt so here we use that to store the size required.
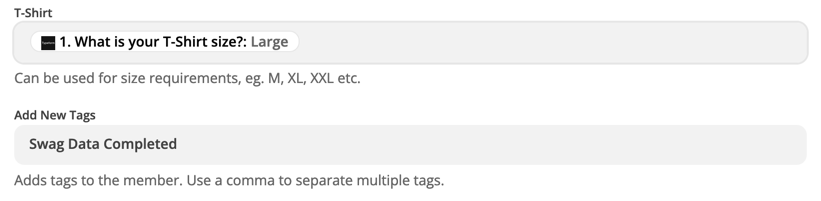
Finally, we use the Add New Tags field to add Swag Data Completed to the Member’s profile. This will allow you to Filter on this specific tag inside Orbit to find folks who have completed your form.

The last step is to add a new Activity to the Member timeline letting us know that they completed the information we asked them for.
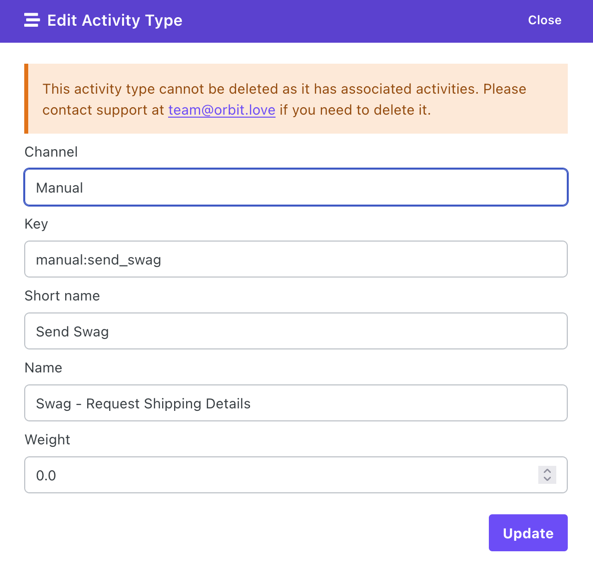
In order to do this, you will need to create one more Activity Type in your Orbit workspace. You can follow the steps outlined at the start of this post but here is a screenshot of the Activity that we use.
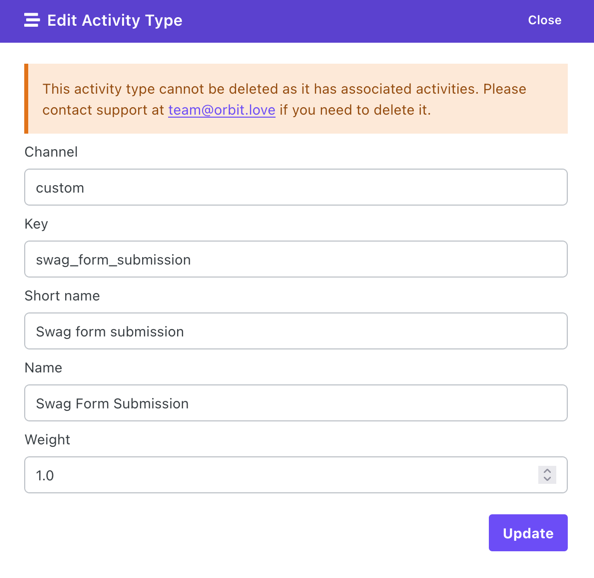
Again, the channel can be whatever you want, in this case we use custom for anything that doesn’t have a specific source, but you could use Zapier or Typeform, or just ‘form’ here if you wanted. Because filling in the form is an engagement activity on the part of the Member, it would be fine to have a weight higher than 0, in this case we use 1.
Adding an Activity to the Member profile
To complete the workflow will add an Activity to the Member’s profile. This is a visual indication that something has happened but it can also be used as the trigger point for other steps you might want to create, such as ‘Send address info to my Swag vendor’, or ‘Alert the team in Slack to create a new order’.
This is what we will add:

Here is how it is set up using the Create Activity action of the Orbit Zapier integration:
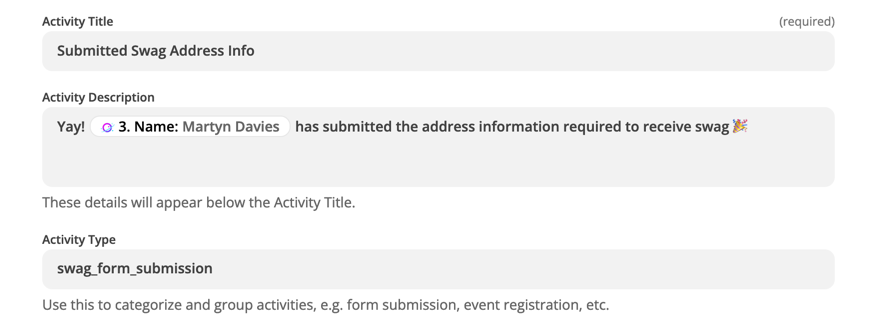
The Activity Title and Activity Description can contain any text you want. Look at the images above to see how they related to what you see on screen in Orbit.
The Activity Type must be the key of the Activity you created previously, ours is swag_form_submission.
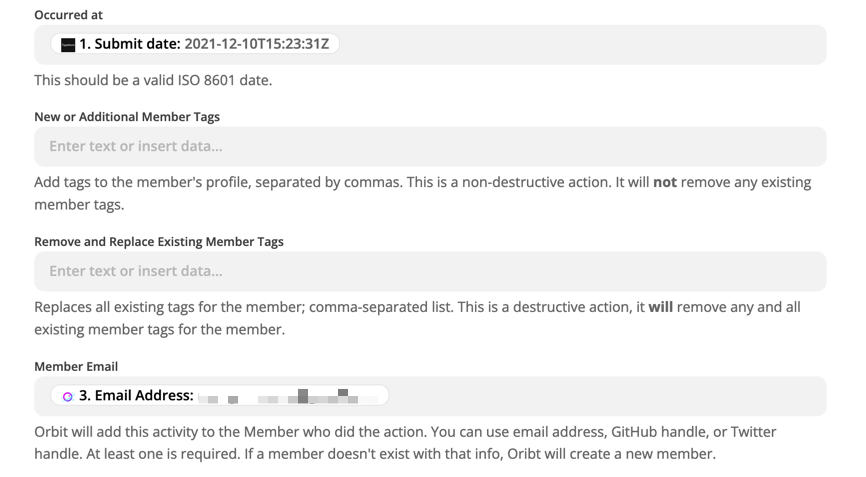
Two other pieces of information are required in the form. The first is Occurred At, this is when the Activity took place, you can use the Submit date from Typeform for this field.
Finally, the Activity we are adding needs to know who it should be attributed to, you can use Member Email to do this and fill out the field with the Email Address from the Member profile gathered in Step 3 of the Zap.
Zap Complete! Now What?
With these two Zaps in place you now have a workflow in place to manually trigger data capture for the start of a process for sending swag. But what else could you do?
If you’re one of the lucky few that uses a vendor with ‘Order via API’ capabilities you could add additional steps to the second Zapier workflow to kick off the ordering process.
You could create another Zap that looks for the Swag Form Submission activity type and use it to alert your team, or maybe another department in your organization that there’s someone out there set to receive their goodies and they should get right on it.
If spreadsheets are your thing then you could add an extra step to the second workflow that adds the information as a new row in a Google Sheet.
The options are about as limitless as the numerous ways that Orbit users have in place to get swag joy sent out to folks today, so get creative and see what else you can automate!


